Blog
February 27, 2018
The Beginner’s Guide to Linux Hardening: Initial Configuration

What is Linux?
Linux has been used for many years across multiple industries and offers customizable and versatile systems. It is, therefore, very important that computers, servers and even virtual machines that run Linux have certain security measures in place. Because Linux-based operating systems (Ubuntu, Debian, RedHat, etc.) are so different and widely used, it’s essential to establish strong security standards to hold each specific operating system to. Fortunately, the Center for Internet Security (CIS) has published benchmarks to be used as standards for securing operating systems, a process known as hardening.
Where do I Start?
In order to secure your Linux instance, you need to have a few things on hand. First and foremost, you must have a Linux operating system installed and set up. As this guide will focus on the process of hardening, we will not delve into the specific details of downloading an operating system (OS) and performing initial configuration. In our example, we will use Ubuntu 16.04. If you are unfamiliar with Linux, begin by researching which type of OS best suits your needs.
After you have chosen an OS, download the accompanying CIS Benchmark from the CIS website. Be sure to acquire the benchmark that matches your specific OS and version, then keep it on hand for use during the walk through. In this example, the security benchmark is CIS Ubuntu Linux 16.04 LTS Benchmark version 1.1.0. Open up a terminal prompt and we can begin.

Initial Setup
We are focusing on the initial configuration security measures for a Linux operating system. When you set up a Linux-based system, there are certain steps you should take to ensure the most secure setup as possible. The first area to address is the filesystem configuration. The main concerns to address here are ensuring that mounting of unnecessary filesystems is disabled, automounting is disabled and that separate partitions exist for important directories, such as /tmp, /var, /dev and /home.
You should also ensure that proper options are set for media partitions.
Next, configure software updates and check filesystem integrity by ensuring AIDE is installed. After that, ensure permissions are configured and the password is set in the secure boot settings. Additionally, ensure SELinux is not disabled in the bootloader configuration and confirm that its state is enforcing and that the policy is configured. It is also recommended that all Linux-based systems have warning banners configured properly.
Lastly, ensure that all the latest software updates, patches and other security software are installed on the system. The specific breakdown for each of these steps and more is detailed below.
Configuring Filesystems
There are certain initial hardening steps that are important to creating a secure Linux system.
Step 1
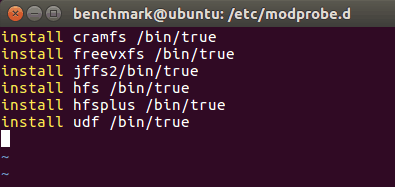
The first step is to configure the filesystems of your OS. Begin by disabling unused filesystems; this includes disabling the cramfs, freevxfs, jffs2, hfs, hfsplus, and udf filesystems. To do this, edit or create and edit the file /etc/modprobe.d/CIS.conf to reflect the image below:
Then unload each of the modules using the following commands
$ rmmod cramfs
$ rmmod freevxfs
$ rmmod jffs2
$ rmmod hfs
$ rmmod hfsplus
$ rmmod udf
Step 2
Next, we need to confirm separate partitions exist for /tmp. This is done during the initial setup of your Linux OS, but can be completed after by creating a new partition and configuring /etc/fstab as necessary. This is the method we will follow. Start by viewing the contents of the file /etc/fstab
$ sudo cat /etc/fstab
If there is no /tmp partition, follow this guide to create a new partition. If the /tmp partition exists, continue below.
Step 3
After you have ensured that the /tmp partition exists, we must ensure that the nodev option is set on the /tmp partition.
$ mount -o remount,nodev /tmp
Step 4
Next, ensure that the nosuid option is set on the /tmp partition.
$ mount -o remount,nosuid /tmp
Step 5
Then create a /var partition. Within that partition, create and then set the options of a /var/tmp partition.
$ mount -o remount,nodev /var/tmp
$ mount -o remount,nosuid /var/tmp
$ mount -o remount,noexec /var/tmp
Step 6
Within the /var partition, create a /var/log partition and a /home/log/audit partition within that partition.
Then create a /home partition and set the options on it as follows:
$ mount -o remount,nodev /home
Next, we will ensure that the options on other partitions are correctly set
$ mount -o remount,nodev /dev/shm
$ mount -o remount,nosuid /dev/shm
$ mount -o remount,noexec /dev/shm
Also ensure that the nodev, noexec, and nosuid options are set on all removable media partitions. Do this by running the following command and verifying that all removable media partitions have nodev, noexec, and nosuid set:
$ mount
To fix this, edit the /etc/fstab file and add nodev, noexec, and nosuid to the mounting options (fourth) field of all removable partitions.
![]()
Step 7
Next, ensure that sticky bit is set on all world-writable directories by running this command:
$ df –local -P | awk {‘if (NR!=1) print $6’} | xargs -I ‘{}’ find ‘{}’ -xdev
-type d \( -perm -0002 -a ! -perm -1000 \) 2>/dev/null
No output should be returned. If there is any output, run this command:
$ df –local -P | awk {‘if (NR!=1) print $6’} | xargs -I ‘{}’ find ‘{}’ -xdev
-type d -perm -0002 2>/dev/null | xargs chmod a+t
Step 8
Finally, disable automounting:
$ systemctl disable autofs
At this point, filesystem configuration is complete.
Configuring Software Updates
Another part of the initial configuration is the configuration of software updates. Begin this by ensuring package manager repositories are configured.
Step 1
$ apt-cache policy
Verify that the package repositories are correctly configured. If not, configure your package manager repositories according to your specific site policy.
Step 2
Next, ensure GPG keys are configured by running the following command:
$ apt-key list
If the GPG keys are not configured correctly, update your package manager GPG keys in accordance with site policy.
Filesystem Integrity Checking
Step 1
To ensure filesystem integrity, start by ensuring that AIDE is installed. Check by running the command:
$ dpkg -s aide
And run the following command to install AIDE if not already installed:
$ apt-get install aide aide-common
Step 2
Next, configure AIDE as appropriate for your environment and initialize AIDE by executing this command:
$ aideinit
If you need help configuring AIDE, look at the AIDE manual for guidance. Afterwards, ensure that filesystem integrity is routinely checked. We will be setting up a scheduled cronjob to run the AIDE check. But, first, check to make sure that one is not already configured compliant with site policy by running the following commands:
$ crontab -u root -l | grep aide
$ grep -r aide /etc/cron.* /etc/crontab
To edit or create the cronjob, run this command:
$ crontab -u root -e
Then add this line:
![]()
This will set a cronjob to run a check every day at 5am. Feel free to change the time and frequency to be compliant with your site policy.
Secure Boot Settings
Now, let’s focus on securing the bootloader and configuring settings directly involved in the boot process. Start by running the following command and verifying that Uid and Gid are both 0/root and Access does not grant permissions to group or other:
Step 1
$ stat /boot/grub/grub.cfg
Verify that the output is:
Access: (0400/-rw——-) Uid: ( 0/ root) Gid: ( 0/ root)
Step 2
In order to set permissions on your grub configuration, run the commands below:
$ chown root:root /boot/grub/grub.cfg
$ chmod og-rwx /boot/grub/grub.cfg
Step 3
Ensure the bootloader password is set. Run these commands to audit and ensure that the outputs match:
$ grep “^set superusers” /boot/grub/grub.cfg set superusers=””
$ grep “^password” /boot/grub/grub.cfg password_pbkdf2
If you need to create an encrypted password, use grub-mkpasswd-pbkdf2:
# grub-mkpasswd-pbkdf2
Enter password: Reenter password: Your PBKDF2 is
Step 4
Add the following lines into /etc/grub.d/00_header or a custom /etc/grub.d configuration file:
cat << EOF
set superusers = “”
password_pdkdf2
EOF
Step 5
Run the following command to update the grub2 configuration:
$ update-grub
Following these steps will properly configure password settings for the grub bootloader. For other bootloaders, follow appropriate steps to properly configure the settings for your environment.
Step 6
Next, ensure that authentication is required for single user mode. Run a grep command to verify whether or not password is set for the root user:
$ grep ^root:[*\!]: /etc/shadow
And no results should be outputted. In order to set a password for the root user, run the following command:
$ passwd root
This ends the boot setup and hardening process.
Additional Process Hardening
For some additional process hardening, we will walk through a few steps that offer extra security measures.
Step 1
First, ensure that core dumps are restricted by executing these commands and ensure the output is as follows:
$ grep “hard core” /etc/security/limits.conf /etc/security/limits.d/*
* hard core 0
$ sysctl fs.suid_dumpable fs.suid_dumpable = 0
$ grep “fs\.suid_dumpable” /etc/sysctl.conf /etc/sysctl.d/*
fs.suid_dumpable = 0
Step 2
If the output is not the same as above, add the following line to either /etc/security/limits.conf or a /etc/security/limits.d/* file:
* hard core 0
And edit the /etc/sysctl.conf or a /etc/sysctl.d/* file to reflect the line below:
fs.suid_dumpable = 0
And run the following command to set the active kernel parameter:
$ sysctl -w fs.suid_dumpable=0
Step 3
Ensure XD/NX support is enabled by checking the output of the following command:
$ dmesg | grep NX NX (Execute Disable) protection: active
Step 4
As recommended by the CIS benchmark, on 32 bit systems, install a kernel with PAE support. No installation is required on 64 bit systems: If necessary configure your bootloader to load the new kernel and reboot the system. You may need to enable NX or XD support in your bios. Next, ensure address space layout randomization (ASLR) is enabled. To audit this, run the following commands and verify that the output is the same:
$ sysctl kernel.randomize_va_space
kernel.randomize_va_space = 2
$ grep “kernel\.randomize_va_space” /etc/sysctl.conf /etc/sysctl.d/*
kernel.randomize_va_space = 2
If the outputs do not match, set the following parameter in /etc/sysctl.conf or a /etc/sysctl.d/* file:
kernel.randomize_va_space = 2
Then run the following command to set the active kernel parameter:
$ sysctl -w kernel.randomize_va_space=2
Step 5
The next step is to ensure that prelink is disabled. Run the following command to restore binaries to normal:
$ prelink -ua
Run the following command to uninstall prelink:
$ apt-get remove prelink
This will end the additional process hardening steps.
Mandatory Access Control
Mandatory Access Control (MAC) builds upon the default Discretionary Access Control (DAC) system. Below we illustrate how to configure both SELinux and AppArmor, though it is not necessary to have both.
Step 1
To start off, ensure that either SELinux or AppArmor is installed on your system. Audit with this command and verify that the output is a series of paths and not a “package not installed” error:
$ dpkg -s selinux
$ dpkg -s apparmor
If the desired package is not installed, run one of the following commands:
$ sudo apt-get install selinux
$ sudo apt-get install apparmor
We will begin by showing how to configure SELinux. First, ensure SELinux is not disabled in bootloader configuration. Do this by running this command and verifying that no Linux line reads selinux=0 or enforcing=0:
$ grep “^\s*linux” /boot/grub/grub.cfg
Step 2
Edit /etc/default/grub and remove all instances of selinux=0 and enforcing=0 from all CMDLINE_LINUX parameters:
GRUB_CMDLINE_LINUX_DEFAULT=”quiet”
GRUB_CMDLINE_LINUX=””
Step 3
Run the following command to update the grub2 configuration:
$ update-grub
Also, ensure that SELinux state is set to “enforcing” and SELinux policy is configured by editing /etc/selinux/config and ensuring the SELINUX and SELINUXTYPE lines match the lines below:
SELINUX=enforcing
SELINUXTYPE=ubuntu
![]()
Step 4
Ensure that no unconfined daemons, or programs that run as background processes, exist.
This is accomplished by verifying that no output is produced when this command is run:
$ ps -eZ | egrep “initrc” | egrep -vw “tr|ps|egrep|bash|awk” | tr ‘:’ ‘ ‘ | awk ‘{ print $NF }’
Configure AppArmor
Next, we willillustrate how to configure AppArmor which provides a Mandatory Access Control (MAC) system in place of the default Discretionary Access Control (DAC).
Step 1
To begin, confirm that AppArmor is not disabled in the bootloader configuration by executing this command:
$ grep “^\s*linux” /boot/grub/grub.cfg
Step 2
Verify that no linux line has the parameter apparmor=0. If this is not the case, edit the file /etc/default/grub and remove all instances of apparmor=0 from all CMDLINE_LINUX lines. Then, update the grub configuration again by running:
$ update-grub
Step 3
Check AppArmor status and ensure that profiles are loaded, no profiles are in complain mode, and no processes are unconfined:
$ apparmor status
If need be, run this command to set all profiles to enforce mode:
$ aa-enforce /etc/apparmor.d/*
Command Line Warning Banners
Messages, warnings, and notifications are necessary for error processing and security. To properly configure these warning banners, follow the steps below.
Step 1
Ensure that message of the day is properly configured. Run the following command and verify that the contents match site policy:
$ cat /etc/motd
Step 2
Run the following command and verify no results are returned:
$ egrep ‘(\\v|\\r|\\m|\\s)’ /etc/motd
If the output is not as desired, edit the /etc/motd file according to your site policy and remove
any instances of \m, \r, \s, and \v.
To ensure local login warning banner is configured properly, we will do a similar process. First, run the following command and verify that the contents match site policy:
$ cat /etc/issue
Step 3
Also, run the following command and verify no results are returned:
$ egrep ‘(\\v|\\r|\\m|\\s)’ /etc/issue
If the output does not match site policy, edit the /etc/issue file accordingly and remove all instances of \m, \r, \s, and \v.
Step 4
Make sure the remote login warning banner is configured properly. First, run the following command and verify that the contents match site policy:
$ cat /etc/issue.net
Step 5
Next run the following command and verify that no output is produced:
$ egrep ‘(\\v|\\r|\\m|\\s)’ /etc/issue.net
If the output does not match site policy, edit the /etc/issue.net file accordingly and remove all instances of \m, \r, \s, and \v.
Step 6
Configure permissions for /etc/motd, /etc/issue, and /etc/issue.net:
$ chown root:root /etc/motd
$ chmod 644 /etc/motd
$ chown root:root /etc/issue
$ chmod 644 /etc/issue
$ chown root:root /etc/issue.net
$ chmod 644 /etc/issue.net
Step 7
After that, ensure that the GDM login banner is configured. If GDM is installed on your system, verify that /etc/dconf/profile/gdm exists and contains the following:
user-db:user
system-db:gdm
file-db:/usr/share/gdm/greeter-dconf-defaults
Step 8
Next, verify that the banner-message-enable and banner-message-text options are configured in one of the files in the /etc/dconf/db/gdm.d/ directory:
[org/gnome/login-screen]
banner-message-enable=true
banner-message-text=’’
Step 9
This is typically configured in /etc/dconf/db/gdm.d/01-banner-message. If these settings are not as above, create or edit the /etc/dconf/profile/gdm file to reflect the following contents:
user-db:user
system-db:gdm
file-db:/usr/share/gdm/greeter-dconf-defaults
Step 10
Create or edit the banner-message-enable and banner-message-text options in /etc/dconf/db/gdm.d/01-banner-message:
[org/gnome/login-screen]
banner-message-enable=true
banner-message-text=’Authorized uses only. All activity may be monitored and reported.’
Step 11
Run the following command to update the system databases:
$ dconf update
Final Step
Lastly, ensure all updates, patches, and additional security software are installed. Run the following command to do so:
$ sudo apt-get -s upgrade
These are the steps we have found to be helpful during Initial Setup.
A Hardened System is a Secure System
There are many security measures that can help prevent and defend against malicious activity. A large portion of these are considered part of the “initial configuration” and provide the basis for securing a Linux-based OS. The combination of a variety of measures can “harden” a Linux-based system to better protect it without having to purchase expensive security solutions or to supplement existing security software. The Center for Internet Security (CIS) recommends following these security measures, and others, to create secure and stabilize Linux environments. Whether it is a new system or a preexisting Linux setup, go through and ensure that as many of the above listed measures are put in place and regularly updated to guarantee the highest level of security possible.
About the Author
Ben Dimick is an information security manager at Tevora.
Brandon Richardson is an information security associate at Tevora.
Links
https://www.cisecurity.org/
https://help.ubuntu.com/community/HowtoPartition/CreatingPartitions
http://aide.sourceforge.net/stable/manual.html